OBS Studio download is your gateway to professional-level streaming and recording. Whether you’re a seasoned streamer aiming for that next-level production or a newbie just starting out, understanding how to download, install, and configure OBS Studio is crucial. This guide walks you through every step, from the initial download to mastering advanced features, ensuring you’re ready to broadcast or capture your content with confidence.
We’ll cover everything from system requirements and installation to advanced techniques and troubleshooting common issues.
This comprehensive guide covers downloading OBS Studio for Windows, macOS, and Linux, detailing the various download options and how to verify their integrity. We’ll dive into optimizing OBS Studio’s performance, regardless of your hardware, and offer a step-by-step setup process for both streaming and recording. We’ll even cover advanced features and techniques to elevate your streams and recordings to the next level.
Get ready to unlock the full potential of OBS Studio!
Official OBS Studio Download Links

Okay, so you’re ready to get OBS Studio up and running? Awesome! First things first: getting the right download. This section will give you the official links, explain the download options, and show you how to make sure you’re getting the real deal and not some imposter software.
OBS Studio is available for Windows, macOS, and various Linux distributions. You’ll want to choose the version that matches your operating system and computer’s architecture (whether it’s 32-bit or 64-bit). Most modern computers are 64-bit, but it’s always good to double-check your system specs.
Download Links and Checksums
Directly downloading from the official OBS Studio website is crucial to avoid malware or corrupted files. Below is a table with verified download links. Remember that these links can change, so always double-check on the official OBS Studio website (obsproject.com) for the most up-to-date information.
| OS | Architecture | Download Link (Example – Replace with actual current links from obsproject.com) | SHA-256 Checksum (Example – Replace with actual current checksums from obsproject.com) |
|---|---|---|---|
| Windows | 64-bit | [Example Link – Replace with actual current link from obsproject.com] | [Example Checksum – Replace with actual current checksum from obsproject.com] |
| Windows | 32-bit | [Example Link – Replace with actual current link from obsproject.com] | [Example Checksum – Replace with actual current checksum from obsproject.com] |
| macOS | 64-bit | [Example Link – Replace with actual current link from obsproject.com] | [Example Checksum – Replace with actual current checksum from obsproject.com] |
| Linux (Example: Ubuntu) | 64-bit | [Example Link – Replace with actual current link from obsproject.com] | [Example Checksum – Replace with actual current checksum from obsproject.com] |
Installer vs. Zip Archive
OBS Studio offers two primary download options: an installer and a zip archive. The installer is generally recommended for ease of use. It handles the installation process automatically, placing files in the correct directories and creating necessary shortcuts. The zip archive, on the other hand, requires manual extraction and placement of files. This option is useful for users who prefer more control over the installation process or for those who might have stricter system requirements or need to install to a non-standard location.
Verifying File Integrity with Checksums
To ensure your downloaded file hasn’t been tampered with during the download process, you should verify its checksum. The checksum is a cryptographic hash – a unique digital fingerprint of the file. After downloading, use a checksum utility (many are available for free online or as part of your operating system’s tools) to generate the checksum of your downloaded file.
Compare this generated checksum to the SHA-256 checksum provided on the official OBS Studio download page. If the checksums match, you can be confident that your download is legitimate and hasn’t been corrupted or altered.
For example, if the official checksum is a1b2c3d4e5f6... and your calculated checksum is the same, you’re good to go. If they differ, even by a single character, something went wrong during the download and you should redownload the file.
System Requirements for OBS Studio
Okay, so you’re ready to dive into OBS Studio, huh? Before you start streaming your epic gaming sessions or recording your killer tutorial videos, let’s make sure your computer can handle it. Knowing your system’s capabilities is key to a smooth, lag-free experience. We’ll break down the minimum and recommended specs, and then talk about how to tweak things if your rig isn’t top-of-the-line.System requirements vary depending on what you’re trying to do.
Streaming 1080p gameplay at 60fps demands a lot more horsepower than recording a simple screen capture. The higher the resolution and frame rate, the more processing power and bandwidth you’ll need.
Minimum and Recommended System Requirements
This table shows the minimum and recommended specs for OBS Studio, broken down by operating system. Keep in mind that these are just guidelines; your actual performance will depend on a number of factors, including your specific hardware and the complexity of your scenes.
| Operating System | Processor (Minimum) | Processor (Recommended) | RAM (Minimum) | RAM (Recommended) | Graphics Card (Minimum) | Graphics Card (Recommended) | Storage Space (Minimum) | Storage Space (Recommended) |
|---|---|---|---|---|---|---|---|---|
| Windows 10/11 | Intel i5-4440 or AMD FX-6300 | Intel i7-8700k or AMD Ryzen 5 2600 | 4 GB | 8 GB | Integrated Graphics | Dedicated GPU (e.g., NVIDIA GeForce GTX 1060 or AMD Radeon RX 570) | 200 MB | 1 GB + space for recordings |
| macOS 10.14 or later | Intel Core i5 or better | Intel Core i7 or better | 4 GB | 8 GB | Integrated Graphics | Dedicated GPU (e.g., NVIDIA GeForce GTX 1060 or AMD Radeon RX 570) | 200 MB | 1 GB + space for recordings |
| Linux (various distributions) | Intel Core i5 or better | Intel Core i7 or better | 4 GB | 8 GB | Integrated Graphics | Dedicated GPU (e.g., NVIDIA GeForce GTX 1060 or AMD Radeon RX 570) | 200 MB | 1 GB + space for recordings |
Hardware Configuration Impact on Performance
Having a beefier system significantly improves OBS Studio’s performance, especially when dealing with high-resolution video. For example, streaming 4K video at 60fps requires a much more powerful CPU and GPU than streaming 720p at 30fps. Insufficient RAM can lead to stuttering and dropped frames, while a slow hard drive can cause delays in recording and playback. A dedicated graphics card is highly recommended for smoother performance, especially when using many sources or effects within OBS Studio.
A system with a powerful CPU, ample RAM, and a dedicated GPU will allow for more complex scenes and higher encoding settings without sacrificing quality or introducing lag.
Optimizing System Settings for Lower-End Hardware
If your computer isn’t a powerhouse, don’t worry! You can still get decent results with OBS Studio by optimizing your settings. Lowering the resolution and frame rate of your stream or recording is the most effective way to reduce the load on your system. Experiment with different encoding settings to find a balance between quality and performance.
Consider reducing the bitrate, which will decrease the file size but may slightly impact quality. Using fewer sources and simpler scenes also helps. You might need to disable or reduce the use of effects like filters or transitions. Prioritize your recordings to an SSD if possible for faster processing speeds. Finally, closing unnecessary background applications while streaming or recording will free up system resources and improve overall performance.
It’s all about finding the sweet spot between quality and what your hardware can handle.
OBS Studio Installation Process
Installing OBS Studio is generally straightforward, but minor hiccups can occur depending on your operating system. This section provides a step-by-step guide for a smooth installation on Windows, macOS, and Linux, along with troubleshooting tips for common problems. Remember to always download OBS Studio from the official website to avoid malware.
The installation process is similar across operating systems, involving downloading the installer, running it, and following the on-screen instructions. However, there are some OS-specific nuances to be aware of.
Windows Installation
Installing OBS Studio on Windows is typically a breeze. The installer guides you through each step, making it quite user-friendly.
- Download the Windows installer from the official OBS Studio website. You’ll see options for 32-bit and 64-bit versions; choose the one that matches your system architecture.
- Run the downloaded installer executable (.exe file). Accept the license agreement and follow the on-screen prompts.
- You’ll be asked to choose an installation directory. The default location is usually fine, but you can change it if you prefer. Choosing a different directory might be useful if you have limited space on your primary drive, or if you want to organize your programs in a specific way.
- Once the installation completes, you can launch OBS Studio from the Start menu.
Potential issues on Windows might include insufficient disk space, antivirus software interfering with the installation, or encountering a corrupted installer file. If you run into problems, try restarting your computer, temporarily disabling your antivirus, or downloading the installer again from the official website. If you are installing on a system with low disk space, you may need to delete unnecessary files or programs to make room.
macOS Installation
Installing OBS Studio on macOS is equally simple. The process involves downloading a package file and following a few straightforward steps.
- Download the macOS installer package (.pkg file) from the official OBS Studio website.
- Double-click the downloaded .pkg file to begin the installation process.
- Follow the on-screen instructions. The installer will guide you through the steps, including selecting the installation location. The default location is usually suitable, but you can change it if desired.
- Once the installation is complete, you can find OBS Studio in your Applications folder.
On macOS, potential issues might include insufficient disk space, or permissions problems. If you encounter an error, ensure you have sufficient administrator privileges. If disk space is an issue, you’ll need to free up space by deleting unnecessary files.
Linux Installation
Linux installation methods vary slightly depending on your distribution (e.g., Ubuntu, Fedora, Debian). Most distributions offer OBS Studio packages through their package managers, providing a streamlined installation experience.
- The most common approach is using your distribution’s package manager. For example, on Ubuntu or Debian, you might use the
aptpackage manager (sudo apt update && sudo apt install obs-studio). Consult your distribution’s documentation for the correct commands and procedures. - Alternatively, you can download a pre-compiled package from the OBS Studio website. This usually involves downloading a .tar.gz file, extracting it, and running the installer.
- Regardless of the method, you might need administrator or root privileges to complete the installation.
- Once installed, you can typically launch OBS Studio from your application menu or terminal.
Troubleshooting Linux installations might involve ensuring you have the necessary dependencies installed, resolving package manager conflicts, or checking your system’s permissions. Refer to your Linux distribution’s documentation for detailed troubleshooting guidance. If using a pre-compiled package, ensure you’ve downloaded it from a trusted source, such as the official OBS Studio website.
Selecting the Installation Directory
Choosing the installation directory is largely a matter of personal preference and organizational style. The default location usually works well, placing the program in a standard location easily accessible by the operating system. However, you might want to change it for several reasons:
- Limited Disk Space: If your primary drive is almost full, installing to a secondary drive with more space prevents installation failures.
- Organization: Some users prefer to keep all their broadcasting software in a dedicated folder, separate from other applications.
- System Drive Separation: Installing to a different drive can improve system performance, especially on older machines, as it reduces the load on the primary drive.
Regardless of your choice, ensure you have the necessary permissions to install in the selected directory. Attempting to install to a protected location without the appropriate privileges will result in an installation failure.
Initial Setup and Configuration of OBS Studio
Okay, so you’ve downloaded and installed OBS Studio – congrats! Now comes the fun part: actually setting it up. Don’t worry, it’s less intimidating than it sounds. This section will walk you through creating a basic profile for either streaming or recording, covering the essentials to get you broadcasting or capturing your content in no time. We’ll focus on getting the core settings right and adding your sources.Getting your OBS Studio setup correctly is crucial for a smooth streaming or recording experience.
Proper configuration ensures your audio and video are clear, your scenes are organized, and your overall workflow is efficient. This initial setup will lay the foundation for all your future OBS projects.
Creating a Basic Profile
Before diving into adding sources, let’s create a basic profile. This involves selecting your recording or streaming destination and setting some initial preferences.
- Choose a Profile: At the bottom of the OBS Studio window, you’ll see a profile selection. If you’re starting fresh, there will likely be a default profile. You can create a new profile by clicking the “+” button. Give it a descriptive name, like “Streaming to Twitch” or “Recording Gameplay.”
- Output Settings: Navigate to “File” > “Settings” > “Output.” Here, you’ll choose your recording or streaming method. For recording, select a folder location and file type (MP4 is generally recommended). For streaming, you’ll need to configure your streaming service (Twitch, YouTube, etc.) by selecting the service and entering your stream key (found on your streaming platform’s dashboard).
- Recording Settings (if applicable): Within the Output settings, you can adjust recording quality, bitrate, and other parameters. Higher bitrates result in better quality but larger file sizes. Experiment to find a balance between quality and file size that works for your setup.
- Streaming Settings (if applicable): Similar to recording, you’ll adjust your streaming bitrate, resolution, and other settings. Your streaming platform likely has recommended settings based on your internet upload speed. It’s crucial to choose settings that are achievable with your internet connection to avoid dropped frames or buffering issues. Check your upload speed using a speed test website before making these selections.
Adding Sources, Obs studio download
Now, let’s add the sources you want to capture. This could be your game, a specific application window, your entire desktop, or even an image or video file.
- Game Capture: If you’re streaming a game, this option is usually the best. OBS Studio often automatically detects running games. Select “Game Capture,” choose your game from the list, and OBS will capture it. Sometimes you might need to select the game’s executable directly if it doesn’t automatically appear.
- Window Capture: This captures a specific application window. Select “Window Capture,” then choose the application window from the dropdown menu. This is ideal for streaming software, presentations, or anything that runs in a window.
- Display Capture: This captures your entire screen. Use this cautiously as it captures everything on your screen, including system notifications and other potentially distracting elements. Select “Display Capture” and choose your monitor (if you have multiple monitors).
- Media Source: Add images, videos, or animated GIFs to your stream using “Media Source.” Browse to your file and OBS will add it as a source. You can then adjust its position and size on the canvas.
Configuring Audio Settings
Proper audio is just as important as video. Clear, balanced audio significantly improves the viewer experience.
- Audio Mixer: The audio mixer lets you control the volume of each audio source. You can adjust the levels for your game audio, microphone, and any other audio sources you’ve added. Ensure your microphone is not too loud or too quiet relative to other sources.
- Microphone/Desktop Audio: Ensure your microphone and desktop audio sources are properly selected and configured. You might need to select your microphone device from a dropdown menu in the “Audio” settings. Test your audio levels before starting a stream or recording to ensure they’re balanced and clear.
- Advanced Audio Settings: For more advanced users, OBS offers features like noise suppression and noise gates to further enhance audio quality. Experiment with these settings to find what works best for your environment.
Understanding OBS Studio’s Interface
Okay, so you’ve downloaded and installed OBS Studio – congrats! Now, let’s dive into the interface. It might seem a little overwhelming at first, but trust me, it’s more intuitive than it looks. This section will break down the main parts and help you get comfortable navigating the software.
The OBS Studio interface is designed around a modular system, allowing you to customize your workflow. Understanding each section is key to efficient streaming and recording.
OBS Studio Interface Layout
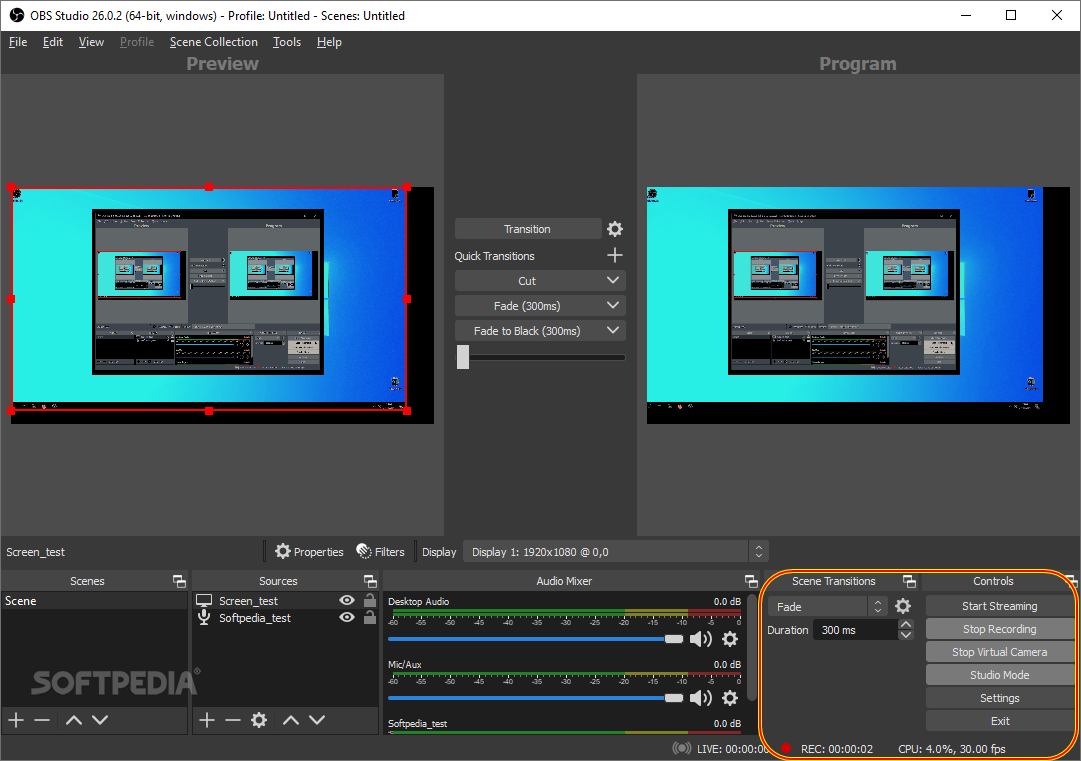
The OBS Studio interface is primarily divided into several key panels. Each panel plays a crucial role in managing your stream or recording. Think of it like a control panel for your broadcast.
| Section | Purpose | Key Features | Visual Description |
|---|---|---|---|
| Scenes | Organizes different configurations of sources for quick switching. Think of a scene as a complete layout for your stream (e.g., intro screen, gameplay, webcam overlay). | Adding, deleting, renaming, and ordering scenes; selecting the active scene. | A list of thumbnails, each representing a different scene setup. Clicking a thumbnail switches to that scene. The active scene is highlighted. |
| Sources | Lists all the individual elements within a scene (e.g., game capture, webcam, microphone audio, text, images). | Adding, deleting, rearranging, and configuring individual sources; adjusting properties like position, size, and visibility. | A list of sources with icons indicating their type. Each source can be individually selected and adjusted. A source’s properties are displayed in a separate panel when selected. |
| Preview | Shows a live preview of the currently selected scene before it goes live or is recorded. This lets you make adjustments without affecting your actual stream or recording. | Real-time visual representation of the active scene; allows for adjustments before going live. | A large window displaying the exact output that will be streamed or recorded. Any changes made to sources will be immediately reflected here. |
| Controls | Provides buttons to start/stop recording and streaming, as well as other quick access controls. | Start/Stop Recording, Start/Stop Streaming, Pause/Resume, Transition buttons. | A row of prominent buttons, usually located at the bottom of the interface. Clearly labeled icons indicate their function. |
Navigating the Settings Menu
The Settings menu is where you configure OBS Studio’s core functionality. Proper configuration is crucial for optimal performance and stream quality. Let’s explore some key areas.
The Settings menu, accessed via “File” > “Settings,” is organized into several tabs. Each tab deals with a specific aspect of OBS Studio’s operation. For example, the “Output” tab is where you configure the streaming and recording settings, specifying the resolution, bitrate, and encoder. The “Audio” tab allows you to manage your audio sources and adjust their levels.
The “Video” tab allows for adjusting the resolution, FPS, and other video settings. The “Advanced” tab contains more technical settings that usually don’t need to be changed unless you are having performance issues or require more specific configurations. Each section is self-, but exploring each option carefully is recommended.
Managing Scenes and Sources
Efficient scene and source management is vital for a smooth and organized streaming experience. Let’s explore how to add, remove, and organize these elements effectively.
Adding a new scene involves clicking the “+” button in the Scenes panel. Similarly, adding a new source involves clicking the “+” button in the Sources panel and selecting the source type (e.g., Game Capture, Display Capture, Webcam, etc.). Organizing your scenes and sources logically, using descriptive names, will make managing your stream much easier. For instance, instead of “Scene 1” and “Source 2,” use names like “Intro Screen” and “Game Capture.” You can also rearrange the order of scenes and sources by dragging and dropping them in their respective panels.
Streaming with OBS Studio
Okay, so you’ve got OBS Studio installed and configured – congrats! Now it’s time to actually stream. This section will walk you through setting up OBS for broadcasting your awesome content to Twitch, YouTube, or Facebook Gaming. We’ll cover everything from getting your stream keys to tweaking your encoding settings for optimal quality.
Streaming involves sending your video and audio data to a streaming platform. OBS Studio acts as the bridge, encoding your content and sending it to your chosen platform. The key is to find the right balance between video quality and bandwidth usage to ensure a smooth, enjoyable experience for your viewers.
Setting Up Stream Keys and Access Tokens
Before you can stream, you need to obtain a stream key (or sometimes a combination of a stream key and an access token) from your chosen streaming platform. This key acts as a unique identifier, allowing OBS Studio to send your stream to the correct account.
Each platform has its own process for generating these keys. For example, on Twitch, you’ll need to navigate to your dashboard, go to your Stream settings, and locate your Stream Key. YouTube requires a slightly different process, involving setting up a stream in your YouTube Studio and copying the stream name and stream key. Facebook Gaming has a similar process through its Creator Studio.
Remember: Keep your stream key secret! Sharing it publicly could allow others to hijack your stream.
Configuring OBS Studio for Streaming
Let’s configure OBS Studio to broadcast your content. This process is similar across all streaming platforms, the only difference being the stream key/access token.
- Open OBS Studio: Launch the application.
- Add Sources: Add all the sources you want to broadcast (game capture, screen capture, webcam, microphone, etc.). Make sure they’re positioned and sized correctly within the preview window.
- Settings -> Stream: Navigate to the “Settings” menu and select “Stream”.
- Service: Choose your streaming platform (Twitch, YouTube, Facebook Gaming).
- Stream Key: Paste the stream key you obtained from your streaming platform’s dashboard into the “Stream key” field.
- Start Streaming: Click the “Start Streaming” button in the bottom right corner of the OBS Studio window.
Streaming Encoding Settings
Encoding settings directly affect your stream’s quality and how much bandwidth it uses. Balancing these is crucial for a good viewing experience and to avoid overwhelming your internet connection. These settings are found in the “Settings” -> “Output” menu.
- Resolution: This determines the dimensions of your video (e.g., 720p, 1080p). Higher resolutions require more bandwidth and processing power.
- FPS (Frames Per Second): This dictates how many frames are sent per second. Higher FPS results in smoother video but demands more bandwidth. Common choices are 30 FPS and 60 FPS.
- Bitrate: This determines the amount of data sent per second. A higher bitrate leads to better quality but consumes more bandwidth. It’s measured in kilobits per second (kbps). A good starting point might be 3500 kbps for 720p at 30 FPS, adjusting based on your internet upload speed and viewer feedback.
- Encoder: OBS Studio offers several encoders (x264, NVENC, QuickSync). Hardware encoders (NVENC, QuickSync) are generally more efficient, placing less strain on your CPU.
Experiment with these settings to find the optimal balance for your hardware and internet connection. Start with lower settings and gradually increase them until you find a sweet spot where your stream is high-quality without causing buffering or lag for your viewers. Remember to check your upload speed to ensure you don’t exceed your bandwidth limits.
Recording with OBS Studio
Okay, so you’ve mastered streaming with OBS Studio – congrats! Now let’s dive into recording. Recording with OBS is super similar to streaming, but instead of sending your video to a platform like Twitch or YouTube, you’re saving it as a file on your computer. This is great for creating YouTube videos, tutorials, or even just saving gameplay footage for later.Recording local videos in OBS Studio involves several key steps, from setting up the output location and file format to fine-tuning the recording settings to achieve the desired balance between video quality and file size.
Proper configuration ensures smooth recordings and manageable file sizes.
Output File Formats and Locations
Choosing the right output location and file format is crucial for easy access and compatibility. You want to pick a location you can easily find, and a format that works with your editing software.
- Choosing an Output Location: Select a folder on your hard drive with plenty of free space. Think about creating a dedicated folder for your OBS recordings to keep things organized. Avoid locations with limited space, like your system drive, unless you have a lot of free space available.
- Choosing a File Format: OBS Studio offers several options, most commonly MP4 and MKV. We’ll delve into the specifics of each in the next section. The choice depends on your needs and the compatibility with your video editing software. For example, MP4 is very widely compatible, but MKV can offer better compression for large files.
Configuring Recording Settings
Balancing video quality and file size is a key consideration when configuring recording settings. Higher quality means larger file sizes, while lower quality results in smaller files but can sacrifice some visual detail. Finding the sweet spot depends on your needs and available storage.
- Bitrate: This controls the amount of data used per second of video. Higher bitrates result in better quality but larger file sizes. A good starting point is around 6000 kbps for 1080p video, but you can adjust this based on your needs. Experiment to find a balance between quality and file size.
- Resolution: This determines the video’s dimensions (e.g., 1920×1080 for 1080p, 1280×720 for 720p). Higher resolutions mean better detail but larger file sizes. Choose a resolution that matches your needs and your hardware’s capabilities.
- Frames Per Second (FPS): This is the number of frames displayed per second. Higher FPS results in smoother motion but larger file sizes. 30 FPS is a common standard, while 60 FPS is often preferred for gaming or fast-paced content. Again, consider your hardware capabilities and the type of content you’re recording.
Recording Formats: MP4 vs. MKV
MP4 and MKV are two popular choices for recording video. They have distinct advantages and disadvantages.
- MP4 (MPEG-4 Part 14): This is a widely compatible format supported by most video players and editing software. It’s generally a good choice for its broad compatibility and ease of use. However, it might not offer the same level of compression as MKV, resulting in larger file sizes for the same quality.
- MKV (Matroska Video): This is a container format that can hold a wider range of codecs and metadata. It often provides better compression than MP4, leading to smaller file sizes for similar video quality. However, it might not be as widely supported by older devices or software.
Troubleshooting Common OBS Studio Issues
Okay, so you’ve downloaded OBS, installed it, and are ready to stream or record. But then…bam*! Something goes wrong. Don’t worry, it happens to the best of us. OBS, while powerful, can be a bit finicky. Let’s tackle some common problems and get you back on track.
This section will cover some of the most frequent headaches people experience, offering straightforward solutions.
Low FPS (Frames Per Second) During Streaming or Recording
Low FPS means your stream or recording looks choppy and jerky, definitely not ideal for a smooth viewing experience. This usually boils down to your computer not having enough processing power to handle the encoding process simultaneously with other tasks.
| Problem | Cause | Solution |
|---|---|---|
| Low FPS | Insufficient CPU/GPU power, high bitrate, high resolution, too many scenes/sources, resource-intensive plugins. | Reduce your output resolution (720p or 1080p instead of 4K), lower the bitrate, reduce the number of scenes and sources in your OBS setup, close unnecessary applications, upgrade your hardware (CPU, GPU, RAM), use a more efficient encoder (like x264 instead of NVENC if you’re having issues with the latter). Consider using hardware encoding if your hardware supports it. |
Audio Issues (No Sound, Crackling, Echo)
Audio problems are a major buzzkill. No one wants to watch a stream with no sound or listen to a recording with constant crackling.
| Problem | Cause | Solution |
|---|---|---|
| No Sound | Incorrectly selected audio input device, muted audio source, low audio input levels, audio device problems. | Check your audio input device settings in OBS. Make sure the correct microphone or audio source is selected and unmuted. Adjust the input levels to ensure they’re not too low or too high (avoid clipping). Check your system’s sound settings to ensure your audio device is working correctly. |
| Crackling or Popping Sounds | High CPU usage, buffer underrun (insufficient audio buffer size), driver issues, interference from other applications. | Close unnecessary applications to reduce CPU load. Increase the audio buffer size in OBS. Update your audio drivers. Check for software conflicts. If using a USB microphone, try a different USB port. |
| Echo or Feedback | Microphone picking up its own output, audio routing issues. | Check your microphone placement. Ensure your microphone isn’t too close to your speakers or headphones. Adjust the audio routing in OBS to prevent feedback loops. Consider using headphones with a microphone instead of desktop speakers. |
Encoding Errors (OBS Crashes, Streaming Stops)
Encoding errors are the worst. They can abruptly end your stream or recording, and sometimes even crash OBS entirely.
| Problem | Cause | Solution |
|---|---|---|
| Encoding Errors | Insufficient system resources, incorrect encoder settings, corrupted OBS installation, hardware failure. | Check your system resources (CPU, GPU, RAM). Lower your bitrate and resolution. Reinstall OBS. Run a hardware diagnostic test to rule out hardware issues. Ensure your drivers are up to date. |
Advanced OBS Studio Features
Okay, so you’ve got the basics of OBS down—streaming and recording are smooth sailing. Now let’s dive into the stuff that’ll really make your streams and recordings pop. We’re talking about taking your productions from “decent” to “damn impressive.” Think cinematic transitions, custom branding, and a level of polish that’ll leave your viewers begging for more.
This section covers the advanced features that will elevate your OBS Studio workflow from basic to pro. We’ll explore powerful tools for enhancing your visual storytelling, adding unique touches, and streamlining your production process. Mastering these features will significantly improve the quality and professionalism of your streams and recordings.
Filters, Transitions, and Scene Switching Techniques
Filters, transitions, and scene switching are key to creating dynamic and engaging content. Effectively using these tools can transform a static broadcast into a polished and professional production. Let’s break down how to use them to their fullest potential.
- Filters: OBS Studio offers a wide variety of filters, from simple color correction and sharpening to more complex effects like chroma key (greenscreen) and noise reduction. Experiment with these to enhance the visual quality of your sources. For example, a simple color correction filter can make your webcam feed look more consistent and professional, while a noise reduction filter can significantly improve the quality of older or low-resolution footage.
So, you’re looking to download OBS Studio? Sweet! After you snag that, you might need to convert some of your tutorial notes into a PDF – that’s where a solid pdf converter comes in handy. Once you’ve got your materials organized, you can get back to mastering OBS Studio and creating killer streams.
- Transitions: Transitions are the visual effects used to switch between scenes. OBS offers a range of built-in transitions, including fades, wipes, and more. Customizing the transition speed and style can dramatically impact the feel of your stream or recording. A quick cut might be suitable for fast-paced gameplay, while a slow fade could be perfect for a more relaxed discussion.
- Scene Switching Techniques: Mastering scene switching is crucial for a smooth broadcast. Practice using hotkeys for quick transitions, and consider using studio monitors to preview scenes before going live. Efficient scene switching prevents awkward pauses and maintains viewer engagement. For instance, having pre-set scenes for different segments of your stream (intro, gameplay, outro) allows for seamless transitions between them.
Utilizing Plugins and Extensions
OBS Studio’s functionality can be significantly expanded through the use of plugins and extensions. These add-ons provide access to a vast array of tools and features not found in the core application. Choosing the right plugins can dramatically enhance your workflow and create unique effects.
- Plugin Management: OBS Studio’s plugin system allows you to add new functionalities without modifying the core application. This ensures stability and easy updates. Many plugins are available from reputable sources, offering features like advanced audio processing, specialized filters, and integration with other platforms.
- Examples of Useful Plugins: Some popular plugins include those offering advanced audio processing (equalizers, compressors, noise gates), additional transition effects, and browser sources for displaying interactive elements. These plugins can significantly enhance the production value of your streams and recordings.
Creating Custom Scenes and Transitions
Creating custom scenes and transitions is a crucial step towards achieving a professional look and feel for your streams and recordings. This allows for precise control over your visual presentation and the creation of a unique brand identity.
- Custom Scene Creation: A well-organized scene collection is essential for a smooth workflow. Create scenes for different segments of your stream or recording, such as intros, outros, gameplay segments, and talking segments. Each scene should be meticulously arranged to minimize adjustments during live streaming.
- Custom Transition Creation: While OBS offers a selection of built-in transitions, creating custom transitions allows for unique branding and visual effects. Although this requires more technical knowledge, the results are well worth the effort, resulting in a more professional and memorable viewing experience.
Final Thoughts
From the initial OBS Studio download to mastering advanced features, this guide has provided a comprehensive overview of everything you need to know to start streaming or recording like a pro. Remember, practice makes perfect – experiment with different settings, explore the vast array of plugins, and most importantly, have fun creating amazing content. So, go ahead, download OBS Studio, and unleash your creativity!
User Queries
Can I use OBS Studio on a Chromebook?
Not directly. Chromebooks typically run Chrome OS, which isn’t officially supported. You might be able to run it using a Linux container, but it’s not guaranteed to work smoothly.
What’s the difference between the 32-bit and 64-bit versions?
64-bit versions can utilize more system RAM, leading to better performance, especially with high-resolution streaming or recording. 32-bit is generally only needed for older systems with limited RAM.
My stream keeps lagging. What should I do?
Check your internet upload speed, lower your streaming resolution and bitrate, close unnecessary background applications, and ensure your computer meets the recommended system requirements.
How do I add a webcam to my stream?
Add a “Video Capture Device” source in OBS Studio. Select your webcam from the dropdown menu. You might need to adjust settings within your webcam’s software as well.
Where can I find OBS Studio plugins?
Many plugins are available from third-party developers. Be cautious and only download from trusted sources to avoid malware.