Animate CC, Adobe’s powerhouse animation software, isn’t just for pros; it’s surprisingly accessible for anyone wanting to dive into the world of 2D animation, motion graphics, and interactive content. Whether you’re dreaming up cartoon characters, crafting engaging web banners, or building interactive games, Animate CC provides the tools to bring your visions to life. This guide will walk you through the basics, explore advanced features, and help you navigate the sometimes-tricky aspects of animation creation.
From understanding the core functionalities and comparing it to other animation software to mastering advanced techniques like ActionScript and integrating with other Adobe Creative Cloud apps, we’ll cover everything you need to know to become an Animate CC whiz. We’ll also tackle common troubleshooting issues and explore the importance of accessibility in your animation projects. Get ready to unleash your inner animator!
Definition and Scope of “Animate CC”
Animate CC, formerly known as Adobe Flash Professional, is a powerful vector graphics editor and animation software primarily used for creating interactive animations, web banners, and even simple games. It’s a robust tool offering a comprehensive suite of features designed for both 2D animation and interactive content development. While its initial focus was on Flash-based web content, its capabilities have expanded significantly to encompass various output formats and platforms.Animate CC’s core functionalities revolve around creating vector-based artwork, animating that artwork using timelines and keyframes, and integrating interactive elements such as buttons, actionscript, and external assets.
Users can manipulate shapes, text, and images with precision, apply various effects, and build complex animations using its intuitive interface. The software allows for both frame-by-frame animation and more advanced techniques like motion tweening and shape tweening, providing flexibility for different animation styles. It also supports exporting to various formats, including HTML5 Canvas, WebGL, and SVG, ensuring compatibility across diverse platforms and browsers.
Target User Base for Animate CC
Animate CC caters to a diverse user base, ranging from professional animators and game developers to web designers and marketing professionals. Experienced animators leverage its advanced features for creating intricate and high-quality animations for film, television, or online platforms. Web designers utilize Animate CC to build engaging interactive web banners and advertisements, enhancing user experience and improving website engagement.
Game developers may use it for creating simple 2D games or integrating animations into larger projects. Even students and hobbyists find Animate CC accessible for learning animation principles and experimenting with creative projects. The software’s versatility makes it suitable for a wide range of skill levels and professional needs.
Comparison of Animate CC to Other Animation Software
Compared to other animation software, Animate CC occupies a unique niche. While software like After Effects excels in compositing and visual effects, Animate CC focuses primarily on vector-based animation and interactive content. Unlike Toon Boom Harmony, which is geared more towards traditional animation techniques, Animate CC emphasizes vector graphics and interactive functionality. Programs like Blender offer 3D animation capabilities, a feature lacking in Animate CC, which remains focused on 2D animation.
However, Animate CC’s strength lies in its ease of use for creating interactive web content and its streamlined workflow for 2D vector animation, making it a preferred choice for specific applications where these features are paramount. The choice of software ultimately depends on the specific project requirements and the animator’s skill set and preferences.
Creating Animations in Animate CC
Animate CC is a powerful tool for creating all sorts of animations, from simple bouncing balls to complex character rigs. It’s user-friendly enough for beginners, yet robust enough for professionals. This section will walk you through the process of creating animations, focusing on practical steps and optimization techniques.
Designing a Simple Animation
Let’s create a simple animation of a square bouncing across the screen. First, you’ll create a new Animate CC document. Choose a size and frame rate appropriate for your animation (e.g., 600×400 pixels, 24 frames per second). Then, using the rectangle tool, draw a square on the stage. On the timeline, you’ll see a single frame.
To animate the square, add more frames to the timeline (e.g., 24 frames). Select the square and move it slightly to the right on frame 5. On frame 10, move it further to the right and slightly down. Continue adding keyframes, adjusting the square’s position to create the illusion of a bounce. You can use the tweening options in Animate CC to smoothly transition between these keyframes.
Experiment with different tween types (like motion tween) to achieve the desired effect. Finally, you can add more bounces by continuing to add keyframes and adjusting the square’s position. Remember to adjust the position of the square to create a realistic bounce, accounting for gravity and momentum.
Creating a Character Animation
Creating a character animation involves a bit more work but leverages the same core principles. Begin by designing your character. You can import artwork or draw directly in Animate CC. Let’s assume you have a character design with separate parts (head, body, arms, legs). Each body part should be on its own layer in Animate CC.
This makes animating individual parts much easier. To animate, you’ll use keyframes again. For a walk cycle, for example, you’d create keyframes for each frame of the animation, subtly adjusting the position of each body part. A walk cycle might involve moving the legs in a stepping motion, and subtly shifting the arms in opposition. You’ll need to carefully time these movements to create a natural-looking walk.
So, Animate CC is awesome for animation, right? But sometimes you need killer sound effects to really bring your project to life. That’s where a solid audio editor comes in handy – you can polish your audio to perfection before syncing it up with your animation in Animate CC. Seriously, good audio makes a huge difference!
Using onion skinning (a feature that shows previous and subsequent frames) can be incredibly helpful in refining the timing and smoothness of your character’s movements. Consider using classic animation principles like squash and stretch to add realism and appeal. For example, stretching the character’s legs as they take a step can add dynamism to the animation.
Optimizing Animation Performance
Efficient animation design is crucial for maintaining a smooth playback. One key aspect is minimizing the number of layers and objects on the stage. The more elements Animate CC needs to render, the slower the performance. Another important factor is using vector graphics whenever possible. Vector graphics scale without losing quality, unlike raster images (like JPEGs), improving performance at different resolutions.
Avoid overly complex artwork; simplify designs to reduce processing demands. Finally, optimize your file size by compressing your assets without sacrificing too much visual quality. Using appropriate file formats, such as optimized PNGs for images, can significantly reduce file size. Remember to regularly test your animation’s performance and adjust your workflow as needed. For instance, if your animation starts to lag, try reducing the number of frames or simplifying the artwork.
By consistently applying these practices, you can create visually rich animations that run smoothly.
Working with Assets in Animate CC
So, you’ve got your animation project cooking in Animate CC, and now you need to bring in all the visual and audio goodies to make it pop. This section dives into how to import, manage, and even create your own assets for a smooth and efficient workflow. Think of this as your ultimate guide to keeping your Animate CC project organized and your creative juices flowing.
Importing and managing assets is crucial for any Animate CC project, regardless of size. Efficient asset management saves you time, prevents errors, and keeps your project clean and maintainable. Whether you’re working on a simple explainer video or a complex interactive game, understanding how to handle your assets is key to success.
Importing and Managing Assets
Animate CC supports a wide range of asset types, including images (JPEG, PNG, GIF, SVG), sounds (MP3, WAV), and video (MP4). Importing assets is generally straightforward: simply drag and drop them from your file explorer into the Animate CC library panel. Alternatively, you can use the “Import” option in the File menu. Once imported, assets appear in the Library panel, neatly organized and ready for use on your stage.
You can easily rename, organize into folders, and even preview your assets within the Library panel for easy identification and selection. Managing these assets efficiently becomes increasingly important as your project grows.
Creating and Using Custom Assets
Beyond importing pre-made assets, Animate CC empowers you to create custom assets directly within the application. For example, you can draw vector graphics using the drawing tools, create buttons and interactive elements using the symbol creation tools, or even design custom animations directly within Animate CC. These custom assets are then stored in the Library panel, just like imported assets, making them readily available for reuse throughout your project.
Creating custom assets offers a high degree of control and consistency in your project’s visual style and functionality.
Workflow for Efficient Asset Management in Large Projects, Animate cc
For larger projects, a structured approach to asset management is essential. Consider using a clear naming convention for your assets (e.g., “button_play_red.png”) to ensure easy identification and organization. Categorize assets into folders within the Library panel based on their type or function (e.g., “characters,” “backgrounds,” “sounds”). Regularly clean up your Library by removing unused assets to prevent clutter and maintain a streamlined workflow.
Version control is also crucial, especially in collaborative projects. Consider using a version control system like Git to track changes and collaborate efficiently.
Asset Types and Their Properties
| Asset Type | File Format | Properties | Notes |
|---|---|---|---|
| Image | JPEG, PNG, GIF, SVG | Dimensions, resolution, color profile | PNGs generally offer better quality for animation due to lossless compression. |
| Sound | MP3, WAV | Duration, sample rate, bit depth | MP3s offer smaller file sizes, while WAVs maintain higher audio quality. |
| Video | MP4 | Duration, resolution, frame rate | Consider using optimized video codecs for smoother playback. |
| Symbol | Animate CC Symbol | Type (graphic, button, movie clip), properties (e.g., color, size) | Symbols enable reusability and efficient management of complex elements. |
Animation Techniques in Animate CC
Animate CC offers a robust suite of animation tools, far surpassing traditional methods in both efficiency and capability. While traditional animation relied heavily on hand-drawn frames and painstaking repetition, Animate CC leverages digital tools to streamline the process and unlock creative possibilities previously unimaginable. This allows animators to focus more on the artistic vision and less on the technical hurdles.
Understanding these techniques is crucial for creating engaging and dynamic animations.
Animate CC provides a range of animation techniques, broadly categorized as tweening and motion graphics, each with its own strengths and weaknesses. Tweening, the cornerstone of many Animate CC animations, allows for smooth transitions between keyframes, while motion graphics provide a more complex and dynamic approach, often incorporating vector-based illustrations and effects.
Tweening in Animate CC
Tweening automates the creation of intermediate frames between keyframes, resulting in smooth animation. Animate CC supports various tween types, including shape tweens, motion tweens, and classic tweens, each suitable for different animation needs. Shape tweens are ideal for morphing shapes, motion tweens for animating objects along a path, and classic tweens for animating properties like position, scale, and rotation.
For example, a shape tween might transform a circle into a square over a specified duration, while a motion tween could animate a ball bouncing across the screen along a predetermined trajectory. The choice of tween type depends heavily on the desired effect. A complex animation might utilize a combination of these tween types for optimal results.
Challenges can arise from managing complex timelines and ensuring smooth transitions between different tween types. Careful planning and organization of the timeline are crucial for avoiding these issues.
Motion Graphics in Animate CC
Motion graphics in Animate CC allow for the creation of dynamic and visually rich animations, often incorporating vector-based illustrations, text, and effects. This technique is particularly useful for creating titles, logos, and other graphical elements that require precise control over movement and appearance. For instance, a logo animation might involve scaling, rotating, and changing the color of the logo over time, creating an engaging introduction sequence.
The flexibility of vector graphics allows for scalability without loss of quality, making motion graphics ideal for various resolutions and output formats. However, creating complex motion graphics requires a strong understanding of vector graphics and animation principles. The complexity of layering and timing can present challenges, requiring careful planning and execution to achieve the desired result. Precise control over timing and easing functions is key to creating visually appealing motion graphics.
Comparison of Traditional and Animate CC Animation Techniques
Traditional animation, a time-consuming process involving hand-drawn or painted frames, often resulted in a unique, hand-crafted aesthetic. However, it was limited by the number of frames an animator could create. Animate CC, on the other hand, provides a digital workflow that allows for rapid prototyping, iteration, and manipulation of animation parameters. While Animate CC can emulate the look and feel of traditional animation, it offers greater flexibility and control, enabling animators to achieve effects that would be impractical or impossible using traditional methods.
The ability to easily edit and modify animations in Animate CC offers a significant advantage over traditional techniques, where corrections often require redrawing entire sequences. Traditional animation’s charm often lies in its imperfections, while Animate CC allows for a level of precision and control unattainable in traditional methods.
Exporting and Publishing Animate CC Projects
So, you’ve painstakingly crafted your animation in Animate CC. Now comes the crucial step: getting it out there for the world to see! Exporting and publishing your project involves several key decisions that affect how your animation looks and performs across different platforms. Choosing the right settings is key to a smooth user experience.Exporting your Animate CC project is more than just hitting a button; it’s about understanding the various output options and optimizing them for your target audience and platforms.
This ensures your animation looks its best and runs smoothly, regardless of the device or browser.
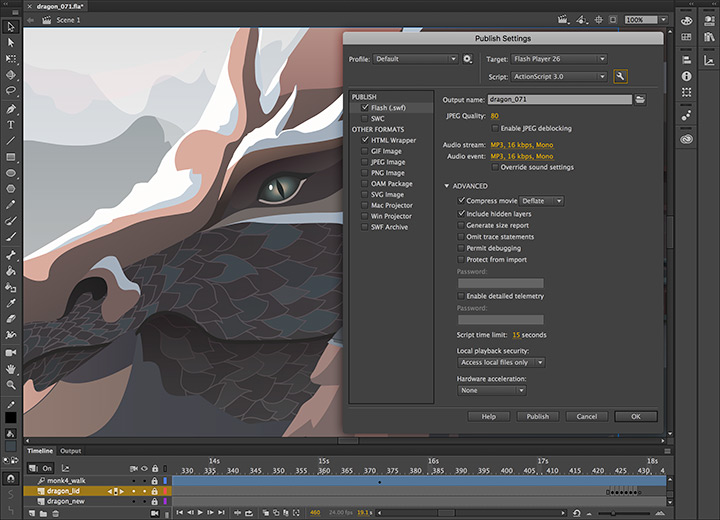
Export Options in Animate CC
Animate CC offers a range of export options to suit different needs. These options allow you to tailor the output to specific requirements, such as file size, compatibility, and performance. You’ll find these options within the File > Export menu. The most common export types are SWF (Shockwave Flash), HTML5 Canvas, and Animated GIF. SWF was the traditional output format for Animate, but HTML5 Canvas is now the preferred choice for broader web compatibility.
Animated GIFs are useful for shorter, simpler animations. Choosing the right format depends entirely on your project’s requirements and the intended platform. For example, if you’re targeting older browsers that may not support HTML5 Canvas, you might consider SWF (though this is becoming increasingly less common). For web use, HTML5 Canvas is generally recommended.
Publishing for Web Use
Publishing your Animate CC project for the web involves several steps beyond simply exporting the animation. First, you’ll need to choose a suitable hosting platform. This could range from a simple personal website to a larger content delivery network (CDN). The chosen platform will affect how users access your animation. Consider the file size of your exported animation; a large file size can lead to longer loading times, impacting user experience.
After selecting your hosting platform, upload the exported files. If you exported as HTML5 Canvas, you’ll likely have an HTML file and associated assets (images, sounds). Make sure all these are uploaded correctly to your web server. Remember to test your animation on various browsers and devices to ensure compatibility and performance.
Optimizing Exported Files
Optimizing your exported files is essential for ensuring your animation performs well across different devices and browsers. This involves carefully considering file size, image compression, and animation complexity. For instance, using smaller image sizes and fewer frames per second can significantly reduce file size without noticeable loss in quality. Experiment with different compression settings for images to find the best balance between quality and file size.
For more complex animations, consider using techniques like sprite sheets to minimize the number of individual assets loaded. Testing on various devices is crucial to pinpoint any performance issues and adjust your optimization strategies accordingly. For example, an animation that runs smoothly on a high-end desktop might lag on a mobile device. Therefore, optimization is an iterative process requiring careful testing and adjustment.
Advanced Features of Animate CC
Animate CC, while powerful for basic animation, truly shines when you delve into its advanced features. These capabilities allow for the creation of sophisticated, interactive experiences far beyond simple frame-by-frame animation. This section explores some key advanced functionalities, focusing on ActionScript, Creative Cloud integration, and interactive content creation.
ActionScript in Animate CC Projects
ActionScript, Adobe’s scripting language, significantly extends Animate CC’s functionality. It allows developers to add complex interactivity, control animation playback, handle user input, and connect to external data sources. For instance, you could use ActionScript to create a game with dynamic scoring, implement branching narratives based on user choices, or even build a fully interactive e-learning module. A simple example might involve using ActionScript to change the color of a button when the mouse hovers over it, adding a subtle visual cue for the user.
More complex scripts could handle communication with a server to update content dynamically or integrate with other applications. The possibilities are vast, limited only by the developer’s skill and imagination.
Integrating Animate CC with Other Adobe Creative Cloud Applications
Animate CC’s strength is amplified by its seamless integration with other Adobe Creative Cloud applications. For example, designers can create stunning vector graphics in Adobe Illustrator and import them directly into Animate CC for animation. Similarly, high-quality images from Adobe Photoshop can be incorporated, maintaining their resolution and visual fidelity. This workflow streamlines the creative process, enabling a collaborative approach where different artists can contribute their specialized skills to a single project.
The ability to import and export assets between applications minimizes the need for file conversion and ensures consistency across the entire design pipeline. Imagine a team where one designer creates artwork in Illustrator, another animates it in Animate CC, and a third integrates it into a larger project in Adobe After Effects – a truly collaborative and efficient workflow.
Creating Interactive Content with Animate CC
Animate CC is ideally suited for building interactive content such as games, e-learning modules, and web banners. Its robust timeline and powerful scripting capabilities allow developers to create engaging experiences that respond dynamically to user input. Consider a simple quiz: Animate CC can be used to create visually appealing questions, track user responses, and provide immediate feedback.
More complex interactive experiences might involve branching narratives, character interactions, or even simulations. The use of buttons, timelines, and ActionScript enables the creation of dynamic and responsive elements, transforming static assets into interactive experiences. For example, a web banner might use ActionScript to change its appearance when the user’s mouse hovers over it, encouraging engagement and interaction.
The possibilities for interactive content are vast and continue to expand as Animate CC evolves.
Troubleshooting Common Issues in Animate CC

So, you’ve dived into the world of Animate CC, creating awesome animations, and suddenly… BAM! An error message pops up, or your animation acts weirdly. Don’t panic! These things happen to even the most seasoned animators. This section will cover some common Animate CC headaches and offer practical solutions to get you back on track. Think of it as your personal Animate CC first-aid kit.
Troubleshooting in Animate CC often involves understanding the context of the error. Is it a file-related problem? A problem with your animation timeline? Or perhaps a coding issue if you’re using ActionScript? A systematic approach is key to efficient problem-solving.
Common Animate CC Errors and Solutions
A frequent source of frustration is dealing with unexpected behavior or crashes. Let’s examine some common errors and their fixes. One common problem is encountering unexpected file corruption. This can manifest as Animate CC freezing, unexpected crashes, or the inability to open a file. Often, this is due to unsaved work or power failures.
A solution is to frequently save your work (using the autosave feature is highly recommended!), ensuring you have multiple backups.
Troubleshooting Animation Problems
Animation glitches can be tricky to diagnose. For example, objects might not animate as expected, layers might be misaligned, or unexpected flickering could occur. Often, these issues stem from problems with the timeline, such as incorrect keyframes, or unintended transformations applied to objects. A methodical approach is to carefully review the timeline, frame by frame, checking for inconsistencies in object properties or unexpected keyframes.
Using the onion skin tool can be invaluable in this process, allowing you to see previous and subsequent frames and identify issues more easily.
Preventing Errors During Development
Proactive measures are far more effective than reactive troubleshooting. A structured workflow significantly reduces errors. A well-defined workflow could include breaking down complex animations into smaller, manageable components. This modular approach allows for easier debugging and modification. Another essential aspect is consistent naming conventions for layers, symbols, and assets.
This dramatically improves project organization and reduces confusion when reviewing or modifying your work later. Think of it like building a house – a solid foundation prevents cracks down the road. Finally, regular testing throughout the development process is crucial. Testing catches issues early on, preventing them from becoming major problems later.
Animate CC and Accessibility
Making animations accessible isn’t just a nice-to-have; it’s crucial for ensuring everyone can enjoy your work. Accessibility in Animate CC means designing animations that are usable by people with a wide range of disabilities, including visual, auditory, motor, and cognitive impairments. This involves considering alternative text, keyboard navigation, and clear visual cues. Let’s dive into some best practices.Creating accessible animations in Animate CC requires proactive planning and careful execution.
Ignoring accessibility limits your audience and can even lead to legal issues. By following accessibility guidelines, you’re not only creating a more inclusive experience but also improving the overall quality of your animation for everyone.
Alternative Text for Visual Elements
Providing alternative text (alt text) for all visual elements is paramount. This text describes the image or animation for screen readers used by visually impaired individuals. In Animate CC, you can add alt text to imported images and symbols. For instance, if you have an image of a cat chasing a mouse, your alt text could be “A cartoon cat playfully chases a cartoon mouse across the screen.” Detailed and accurate alt text is key to conveying the meaning and context of your visuals.
Vague descriptions like “image” or “animation” are unhelpful.
Keyboard Navigation
Many users rely on keyboard navigation, either due to motor impairments or preference. Ensure all interactive elements within your Animate CC animation are accessible via the keyboard. This means avoiding reliance on mouse clicks alone. Test your animation thoroughly using only the keyboard to confirm that all actions can be triggered using keyboard shortcuts.
Color Contrast
Sufficient color contrast between text and background is essential for readability. People with visual impairments may find it difficult to read text with poor contrast. Animate CC offers tools to check color contrast, but you can also use online tools to verify that your color combinations meet WCAG (Web Content Accessibility Guidelines) standards. Aim for a contrast ratio of at least 4.5:1 for normal text and 3:1 for large text.
For example, using dark text on a light background or vice-versa generally ensures good contrast.
Captions and Transcripts for Audio
If your animation includes audio, provide captions or a full transcript. This ensures accessibility for deaf or hard-of-hearing individuals. While Animate CC doesn’t directly support captioning, you can create captions separately and then incorporate them visually into your animation. Similarly, creating a text-based transcript of the audio content allows users to follow along.
Clear and Consistent Visual Cues
Use clear and consistent visual cues to guide users through the animation. This includes using distinct visual changes to indicate interactivity or changes in state. For example, highlighting interactive elements on hover or using clear animations to show progress or completion of tasks. Avoid relying on subtle visual changes that might be missed by users with visual impairments.
Timing and Pacing
Consider the pacing and timing of your animation. Fast-paced animations can be difficult for some users to follow, especially those with cognitive impairments. Allow users sufficient time to process information presented in the animation. Provide options for adjusting the speed or pausing the animation if possible. For example, a tutorial animation could include a “pause” button and adjustable playback speed.
Future Trends and Developments in Animate CC
Animate CC, while a powerful tool, exists in a constantly evolving digital landscape. The animation industry is rapidly changing, driven by technological advancements and shifting audience expectations. To remain competitive, Animate CC needs to adapt and incorporate new features to meet these evolving needs. This section will explore potential future updates and directions for the software.
Predicting the future of any software is inherently speculative, but by analyzing current trends and unmet needs within the animation industry, we can make informed projections about the potential evolution of Animate CC. The focus will likely be on enhancing workflow efficiency, expanding creative capabilities, and improving integration with other Adobe Creative Cloud applications.
Improved 3D Integration and Capabilities
Currently, Animate CC’s 3D capabilities are somewhat limited. Future updates could significantly improve this aspect. Imagine seamless integration with Adobe Substance 3D, allowing animators to import and manipulate high-fidelity 3D models directly within Animate CC’s workflow. This would open up possibilities for richer, more immersive animations, particularly in areas like game development and virtual reality experiences. Enhanced 3D tools could include improved camera controls, lighting effects, and realistic material rendering, all directly within the Animate CC interface.
Enhanced Collaboration Features
The animation process often involves multiple artists and collaborators. Future improvements to Animate CC could center around enhancing real-time collaboration features. This could involve features similar to those seen in other Adobe applications, allowing multiple users to work on the same project simultaneously, viewing each other’s changes in real-time. Improved version control and comment features would also be highly beneficial, streamlining the feedback and revision process.
AI-Powered Animation Assistance
Artificial intelligence is rapidly transforming various creative fields. Animate CC could benefit from integrating AI-powered tools to assist animators with repetitive tasks. This could include AI-driven in-betweening, automatic lip-syncing based on audio input, and even AI-assisted animation style generation. Imagine an AI that could analyze an animator’s existing style and automatically generate similar animations based on simple input parameters.
This would drastically speed up the animation workflow and allow animators to focus on more creative aspects of their work. This mirrors the development of AI tools in other creative fields, such as AI-assisted image upscaling and style transfer seen in Photoshop.
Improved Performance and Optimization
As animation projects become increasingly complex, the performance of Animate CC becomes crucial. Future updates should prioritize optimization to ensure smooth performance even with large and intricate projects. This could involve improvements to the rendering engine, better memory management, and enhanced support for high-resolution displays and powerful hardware. This would allow animators to work more efficiently and seamlessly on projects of any scale, without experiencing performance bottlenecks.
End of Discussion

So, there you have it – a whirlwind tour of Animate CC! From simple animations to complex interactive projects, Animate CC empowers you to create engaging and dynamic content. Remember, practice is key; experiment with different techniques, explore the vast resources available online, and don’t be afraid to push your creative boundaries. With Animate CC, the only limit is your imagination.
Now go forth and animate!
Top FAQs
What’s the difference between Animate CC and After Effects?
Animate CC is geared towards 2D vector animation and interactive content for web and mobile, while After Effects excels in motion graphics and compositing for video. They’re distinct tools with overlapping capabilities but different strengths.
Can I use Animate CC for game development?
Yes! Animate CC is a solid choice for creating 2D games, especially those with simple mechanics. Its interactive capabilities and ActionScript support make it suitable for building engaging game experiences.
Is Animate CC difficult to learn?
The learning curve depends on your prior experience with design software. While it has a powerful feature set, Animate CC offers plenty of tutorials and resources to guide beginners. Start with the basics and gradually build your skills.
How much does Animate CC cost?
Animate CC is part of the Adobe Creative Cloud subscription, so the cost depends on the plan you choose. Check Adobe’s website for the latest pricing information.
What file formats does Animate CC support for export?
Animate CC supports a variety of formats, including SWF (Flash), HTML5 canvas, video (MP4, AVI, etc.), and various image formats (PNG, JPEG, etc.). The best format depends on your intended use.